Todos
Keep track of tasks and improvements directly in your code with Hammer's TODO management system.
Introduction
Hammer's TODO feature allows you to mark tasks and notes directly in your HTML files. These TODOs are collected by Hammer and displayed in the UI, making it easy to track what needs to be done across your project.
TODOs help you:
- Track tasks and improvements inline with your code
- Stay organized with centralized TODO management
- Never forget important changes or improvements
- Collaborate more effectively with clear task markers
Basic Usage
To add a TODO, use the @todo or @TODO directive with a message:
<!-- Your HTML content -->

<!-- @todo Update header design -->
<!-- @TODO Add mobile navigation -->

<!-- More content -->
Hammer will automatically collect all TODOs from your project and display them in the UI for easy reference.
@@todo and @@TODO work the same way. Use whichever style you prefer for consistency.
How It Works
When you add TODO directives to your files:
- Hammer scans your files: During the build process, Hammer searches for all TODO directives across your project
- TODOs are collected: All TODO items are gathered and organized by file
- Displayed in UI: Hammer displays all TODOs in a centralized, interactive view
- Easy tracking: You can see all tasks at a glance and track your progress
TODOs remain as comments in your HTML files and won't appear in the compiled output, making them perfect for development notes.
Interactive UI
Hammer's TODO UI is fully interactive, making it easy to manage your tasks directly from the interface:
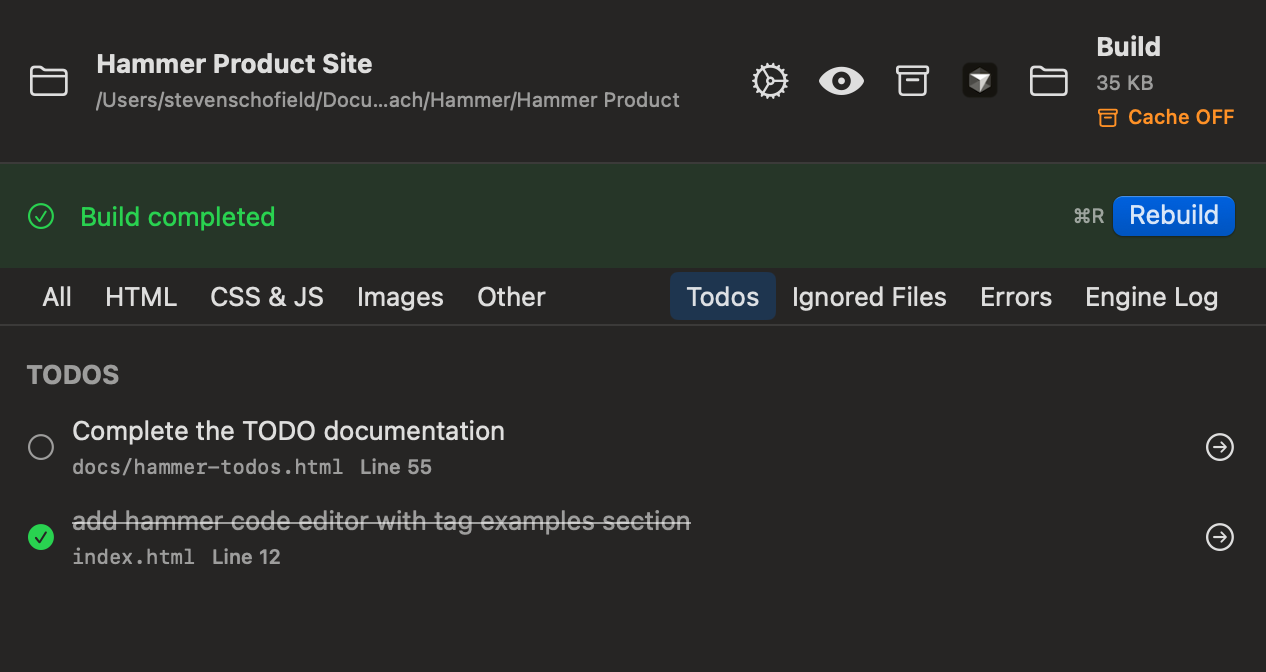
Marking TODOs as Complete
You can mark TODOs as complete directly in the UI by clicking on them. When you mark a TODO as complete:
- The TODO is updated in your code with
DONEadded to the tag - The TODO appears with a checkmark in the UI
- The original TODO message is preserved
<!-- Original TODO -->
<!-- @todo Complete the TODO documentation -->

<!-- After marking as complete in UI -->
<!-- @todo DONE Complete the TODO documentation -->
Deleting TODOs
You can delete TODOs directly from the UI. When you delete a TODO:
- The TODO tag is completely removed from your code
- The TODO disappears from the UI list
- No trace of the TODO remains in your files
Examples
Basic TODO
<header>
    <nav>
        <!-- Navigation content -->
    </nav>
</header>

<!-- @todo Improve mobile navigation menu -->
Multiple TODOs
<main>
    <section class="hero">
        <!-- Hero content -->
    </section>

    <!-- @todo Add hero animation -->
    <!-- @TODO Optimize hero image -->
    <!-- @todo Update CTA button styling -->
</main>
With Context
<div class="features">
    <!-- Feature list -->
    <!-- @todo Add more features - currently only showing 3 -->

    <div class="pricing">
        <!-- Pricing table -->
        <!-- @TODO Implement pricing calculator - waiting on design -->
    </div>
</div>
Best Practices
Writing Effective TODOs
- Be specific about what needs to be done
- Include context when helpful (e.g., "waiting on design")
- Use consistent formatting across your project
- Place TODOs close to the relevant code
- Remove TODOs when tasks are completed
Organization
- Group related TODOs together when possible
- Use descriptive messages that make sense out of context
- Consider priority when organizing multiple TODOs
- Regularly review and update your TODO list
Workflow
- Add TODOs as you think of improvements
- Review all TODOs periodically during development
- Check off TODOs in the UI as you complete them
- Remove completed TODOs from your code to keep it clean
Next Steps
Now that you understand TODOs, learn about:
- Hammer Includes for reusable components
- Variables for dynamic content
- Live Reload for faster development